Valetudo
Cloud replacement for vacuum robots enabling local-only operation
View the Project on GitHub Hypfer/Valetudo
General
Newcomer Guide Why Valetudo? Why not Valetudo? Getting Started So you've been banned? Supported Robots Rooting Essentials Buying Supported Robots Media & Content Creators
Installation
Usage
Implementation Overview Capabilities Overview Upgrading Firmware Updates
Companion Apps
Valetudo Companion (Android) Valetudo Tray Companion Valeronoi Lovelace Valetudo Map Card I Can't Believe It's Not Valetudo node-red-contrib-valetudo Fun & Games Other Noteworthy Projects
Integrations
MQTT Home Assistant Node-RED openHAB
Misc
FAQ Style Guide Troubleshooting
Development
Midea rooting and installation
Please check the supported robots page to find out which method applies to your model of robot.
Also note that all rooting guides assume a factory-new robot that has never been connected to the vendor cloud.
If you’ve used any vendor apps before, make sure to do a full factory-reset before starting with the rooting procedure.
Valetudo will never require you to use any vendor app.
In fact, using it will potentially interfere with your ability to install and use Valetudo.
ADB
This Guide assumes that you have booted a fresh copy of Debian 13 Live with some kind of GUI (e.g. KDE) on your laptop.
Please use a native environment for this, as VMs will usually be troublesome.
Important:
This method can permanently brick your robot if you're not careful.
These robots aren't exactly resilient or recoverable.
Make sure that you understand what you're doing before doing it.
Depending on the model, dock and robot communicate via BLE and need to be paired and connected while flashing.
For rooting you will therefore need a laptop and sit down with it next to the dock housing the docked robot.
High-level overview
The path to Valetudo here is actually remarkably simple:
- We get a shell through either:
- The happy path
- The unhappy path
- We push a custom update package onto the robot
- We install that package by running the install script over and over again until it deletes itself
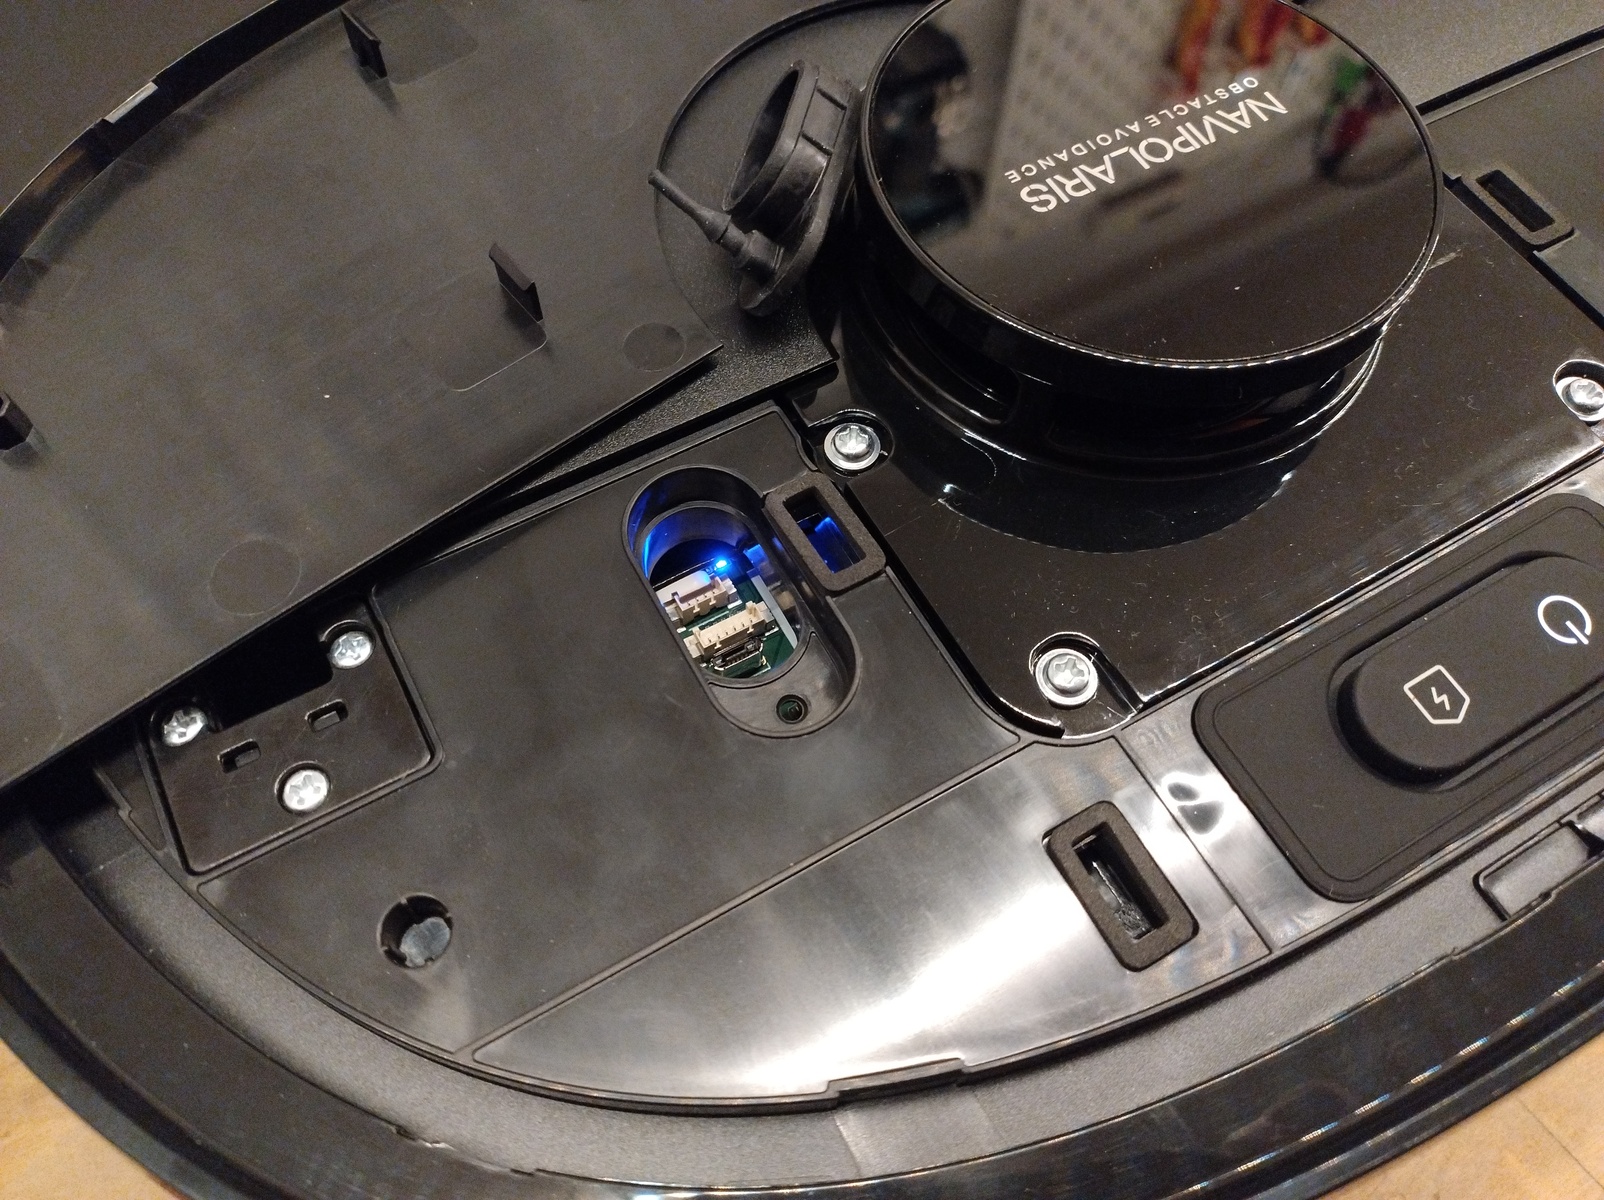
Step 0: Finding the Micro USB port
To start with the root, you will first need to find out where to connect to the robot. Regardless of model, this will require some plastic Pry Tool. I’m personally using some cheap AliExpress Kit for Car Trim Parts.
Armed with your trusty injection-molded crowbar, the path to the port will be one of these:

Step 1: Determining the path
With the port located, the next step is to plug it in and run adb shell.
After typing in root as the username, you should see one of the following:
midea login: root
OTP Password:
or
midea login: root
Password:
If you’re seeing OTP Password:, then you’re on the happy path. Otherwise, it’s the unhappy path.
Which one you will get depends on the model of robot and the installed firmware version, meaning that it may change if the firmware has been updated. As always with this kind of hardware hacking, every firmware update has the potential to come with new locks, meaning that you should not ever update using the vendor app/cloud.
Step 2: Building the update package
Before you continue with the next steps, build an update package for manual installation via the Dustbuilder.
Make sure that both Prepackage valetudo and Patch DNS are selected before clicking on Create Job.
You will receive an email once it’s built. Download the tar.gz file from the link in that mail to your laptop.
With the tar.gz downloaded, head over to https://github.com/Hypfer/valetudo-helper-httpbridge
and download a matching binary for your laptop’s CPU architecture.
This will later be used to transfer the update package to your robot.
Step 3.1: The happy path
If you saw OTP Password:, the next step is to run dmesg and look for output looking like this:
[ 4479.875489] usb 1-4: new high-speed USB device number 11 using xhci_hcd
[ 4480.016640] usb 1-4: New USB device found, idVendor=2207, idProduct=0019, bcdDevice= 3.10
[ 4480.016658] usb 1-4: New USB device strings: Mfr=1, Product=2, SerialNumber=3
[ 4480.016665] usb 1-4: Product: robot
[ 4480.016670] usb 1-4: Manufacturer: world
[ 4480.016674] usb 1-4: SerialNumber: 243f6a8885a308d3
[ 4480.020308] cdc_acm 1-4:1.1: ttyACM0: USB ACM device
Then, use the SerialNumber with this nifty calculator:
You should then be able to login as root with the password calculated for your device.
Remember that the robot needs to be factory-reset for it to work.
Additionally, the robot should be sitting in its dock.
By pressing and holding the Wi-Fi config button of the robot for a few seconds and then letting go, the robot will spawn a Wi-Fi AP you need to connect your laptop to.
The Wi-Fi config button will either be a dedicated button or share a button with the “Spot Cleaning” function.
If the AP needs a password, use 12345678.
Step 3.2 The unhappy path
On robots where you just get a Password: prompt, things are a bit more hacky.
Here, we need to exploit a race condition in an init script to spawn a telnetd to eventually get a shell.
First, you will need to create two files:
echo -n 'LMAO' > test.mod

echo '#!/bin/sh' > payload.sh
echo '/bin/busybox telnetd -l /bin/sh -p 1337 &' >> payload.sh

chmod +x payload.sh
Then, while connected via microUSB to the turned-off robot, start the loop:
while true; do adb push test.mod /oem/test.mod; adb push payload.sh /userdata/echo_pcbatest_server; done
On my J12 I’ve noticed that dock pairing can be a bit fragile and fiddly. There, I recommend booting the robot
not by pressing the power button but by unplugging the dock, docking the robot, then replugging the dock into the wall to make the robot boot up.
You might have to repeat this dance a few times during the rooting procedure.
On the E20 robots, no such dance is necessary. Just turn it on.
Once you hear the boot-up sound, you can Ctrl + C the loop.
By pressing and holding the Wi-Fi config button of the robot for a few seconds and then letting go, the robot will spawn a Wi-Fi AP you need to connect your laptop to.
The Wi-Fi config button will either be a dedicated button or share a button with the “Spot Cleaning” function.
If the AP needs a password, use 12345678.
Once connected, in a new terminal, you can then get a shell using:
telnet 10.201.126.1 1337
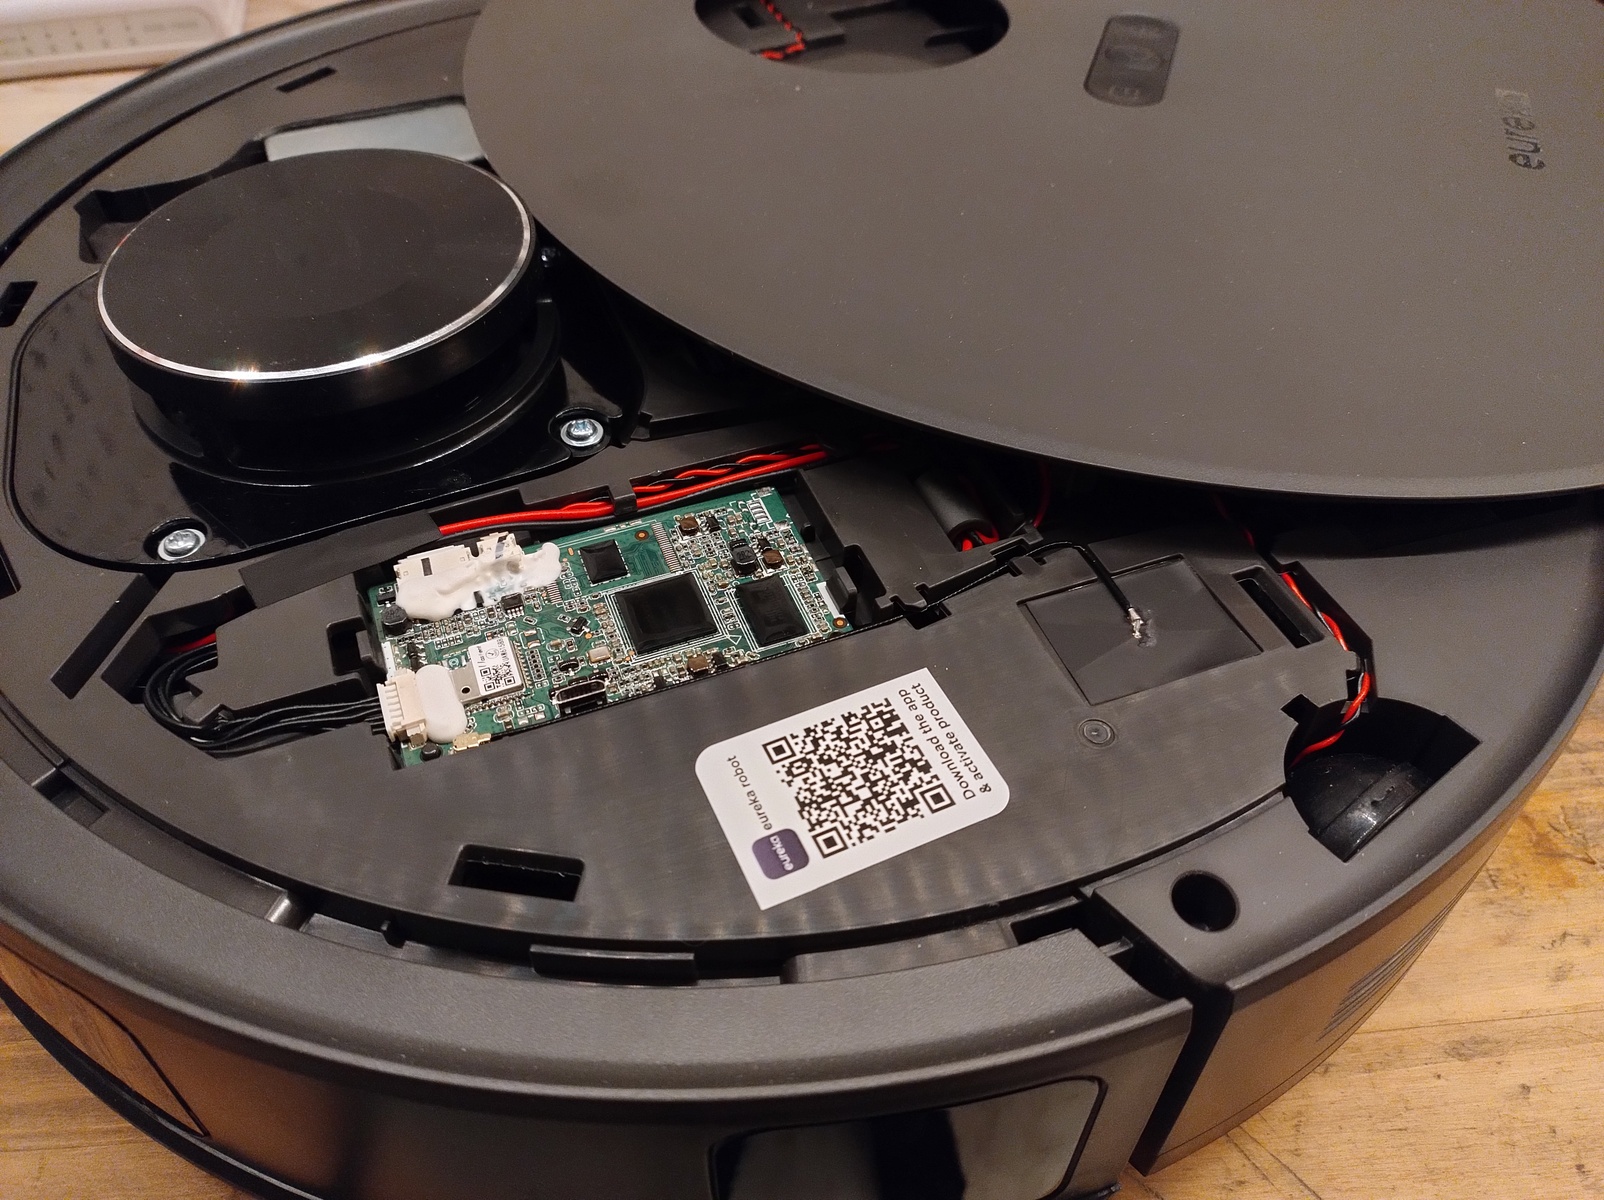
Step 4: Transfer
With shell access and the laptop connected to the Wi-Fi AP of the robot, in another terminal, run the httpbridge helper utility webserver.
The server will create a new www directory right next to itself as well as print out a few sample commands explaining how to download from and upload to it.
They will look somewhat like this:
wget http://10.201.126.2:1337/midea.j15u_fw.tar.gz
Now, put your update package into the www folder.
Switch back to the shell on the robot, cd into /tmp, and then download the tar.gz from the laptop to the robot by adapting the aforementioned sample commands.
Step 5: Install
Because we cannot use the normal process for OTA updates as those rely on the cloud, we need to make use of debug tooling. This makes the process a bit inelegant, as the robot might need to reboot multiple times during the procedure.
The install script does take over all of the thinking though, so it’s just a matter of running it a bunch of times.
For the initial run, use this one-liner:
tar xvf midea.*_fw.tar.gz && rm -f midea.*_fw.tar.gz && chmod +x ./install.sh && ./install.sh
The installer will then copy itself to /userdata/dust_update/ and relaunch from there.
From there on, just follow what it tells you to do and relaunch it after every reboot up until it deletes itself.
After the first reboot, you relaunch it by running:
/userdata/dust_update/install.sh
Eventually, Valetudo will be installed and you can continue with the getting started guide.
Note:
There can be minimum firmware requirements for updates.
If the installer refuses to run due to a too old firmware, just select the next-older version in the dustbuilder, build a new package and try again.
Valetudo
Cloud replacement for vacuum robots enabling local-only operation
View the Project on GitHub Hypfer/Valetudo
General
Newcomer Guide Why Valetudo? Why not Valetudo? Getting Started So you've been banned? Supported Robots Rooting Essentials Buying Supported Robots Media & Content Creators
Installation
Usage
Implementation Overview Capabilities Overview Upgrading Firmware Updates
Companion Apps
Valetudo Companion (Android) Valetudo Tray Companion Valeronoi Lovelace Valetudo Map Card I Can't Believe It's Not Valetudo node-red-contrib-valetudo Fun & Games Other Noteworthy Projects
Integrations
MQTT Home Assistant Node-RED openHAB
Misc
FAQ Style Guide Troubleshooting